
TransPost Help
Using TransPost
Import Data into MYOB AccountRight
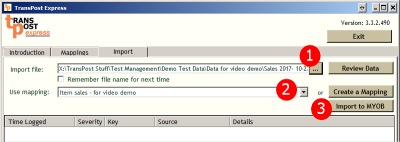
- Select your input file, browse using the
 button
 - Select one of the mappings you have created from the drop down list
- Click the Import to MYOB button
Getting Started
If you still use Classic AccountRight (MYOB version 19) you cannnot use TransPost Version 4.
First you need to: To download and use version 3.3.7 see Getting Started with Version 3
- download and install the required version of TransPost
- configure a connection to your company file
- create or import your mappings
Download and install
| Version | Released | |
 |
TransPostExpress Setup 4.0.0.874 ... 1.17MB | 5/06/2023 |
|
TransPost Setup 4.0.0.875.exe ... 1.24MB | 5/06/2023 |
|
TransPost Plus Setup 4.0.0.876.exe ... 1.33MB | 5/06/2023 |
|
TransPost Premier Setup 4.0.0.877.exe ... 1.33MB | 5/06/2023 |
Configure a connection to your company file
For details on how to configure your TransPost to connect to your company file see Connect your Company FileCreate Mappings
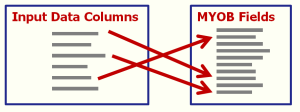
There are general instructions on how to create mappings on the Mappings page or you can watch the video 'Import Sales into MYOB Express with TransPost Express' below to see a detailed walkthrough showing how to create and use a mapping to import Item Sales.
Import Mappings
For some applications we have provided standard mappings that you can just download and import. See Mappings available to download.You can also import them as useful examples that you can make over to suit your purposes.
These videos and more are all on the TransPost channel on YouTube.